
Basics Series 2 Presents
Seeing The Simple Shapes
A Beginner's Guide to Organics
by Quinnyp
Seeing The Simple Shapes
A Beginner's Guide to Organics
by Quinnyp
Roadmap
Introduction
1. The Tools
2. The Anatomy of a Build
3. Building a Base
4. A Clearer Reference
5. Combining Skills
Examples
Summary + Final Thoughts
Introduction
Trouble With Organics? Quinny can help!
Hello, and welcome to the Basics series article on ORGANICS–an intimidating aspect of building for many that can seem pretty complicated at first glance. With organics, we are often looking at references and are expected to replicate them as flawlessly as possible.
Organic builds are tough in this way. We are working with references of many different mediums, such as two dimensional drawings, 3D animated work, or even real life photographs. As a builder, some strategy is required to nail the structures and poses in our work for Minecraft.
A Method to the Madness
There are many different ways to build, and everyone has their own methods to their madness. However, learning about the different strategies that others use to build can help you grow as a builder. Draw upon the strategies that resonate the most with how you work, and run with them!
This article will give you some insight on how traditional artists learn to draw and see the simple shapes in everything, which we can use to create 3D bases for organics using WorldEdit.
What this article will NOT do is give you the ability to detail by hand and perfect those finishing touches that will finish off your build. Much of those skills are developed over time and through lots of practice to gain that “builder’s eye”–an ability I like to think of as seeing builds and knowing exactly how to touch them up more and more quickly.
TL;DR: This article is a jumping off point for getting into organics and breaking them down in such a way that, if you have a grasp on WorldEdit, you will be much closer to making accurate organics.
1. The Tools
This strategy will require you to have a good handle on WorldEdit and some other skills, especially the following:
- spheres and making irregular spheres (//sphere [block] [radius],{height},{width})
- rotation across both the x and y axes (//rotate [x] [y] [z])
- simple brushes (mostly /brush sphere is used, but cylinder can be helpful in some cases)
- solid understanding of the clipboard (how to //flip, other commands that require you to position yourself a certain way to //paste how you want)
If you are looking for some resources, I actually have a plot dedicated to explaining WorldEdit (/plot v Quinnyp 25) with some tips and tricks. Only the “beginner” level lessons are complete, but I plan on adding more lessons over time. If you are looking for more resources about WorldEdit, here’s a playlist of content by MegRae.
2. The Anatomy of a Build
The first aspect of organic build structure that must be discussed is the anatomy of the build. Anatomy in this article refers to the basic shapes that make up an organic build.
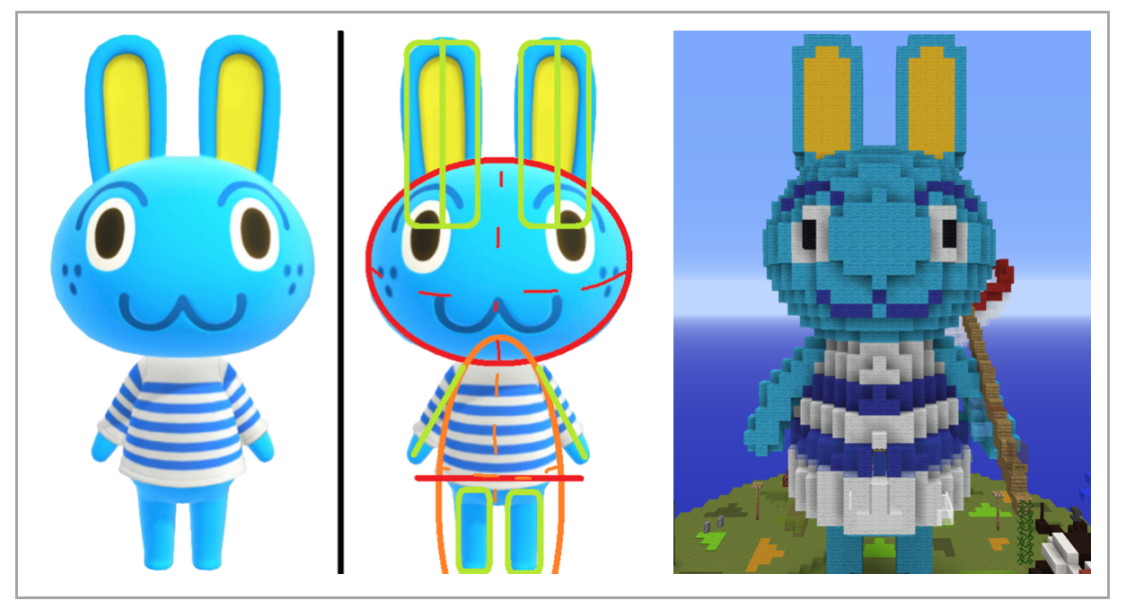
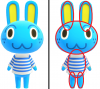
For example, let’s look at a reference picture used for Hopkins:
(all pictures in this article are click to view full size)
If nothing else, this view is a confidence builder. The truth is, if you can use WorldEdit, you can make these shapes…and in turn, you can build Hopkins, or anything else you put your mind to.
3. Building a Base
When starting an organic build, it might be hard to figure out where to start. Organics generally have a lot of components to them. When looking at reference photos, a question to ask is, “what are the shapes I can easily identify?” and your best bet is to begin your build with those.
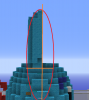
Let’s use Hopkins as another example for building a base. You can use any block you desire while creating a base, here we are using white wool.
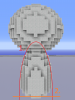
This isn’t a complete base, but we can take note of a useful tip when creating bases here. We can create irregular spheres, (they’re actually ovoids, apparently) and modify them to create the shape we desire.
4. A Clearer Reference
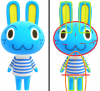
Looking back at the Hopkins reference, his shirt actually creates a more sharp edge than a simple oval that was drawn. So, we can actually create an ovoid twice the size in game with //sphere, //cut it in half, and do some simple contouring to get the shape we want for Hopkins’ body.
Considering this, we can mark up the reference a different way:
There is far more than one way for you to build your shapes. Large spheres will be created with //sphere, but smaller shapes for legs, arms, fingers, etc. all may benefit from the use of a simple /brush sphere instead. Areas that were built with /brush sphere of varying sizes (in this case, 1 for the arms and legs and 3 for the ears) are drawn in green.

5. Combining Skills
Hopkins’ ear is a great example in itself of combining our concept of using /brush sphere and cutting shapes to better suit our purposes. We can brush out the length we want for the ear as a full sphere, and chop the front half of the spheres off to create our ear. //copy and //paste and we have two, cute, inflatable bunny ears.
Examples From Current Maps
The Method on Smart Fella - Insane (built by caseyclosed)
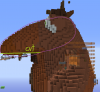
The build for Smart Fella is a great example of an organic that can be broken down into simple shapes. Let’s take a look at a breakdown of the build from the front:
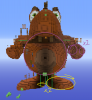
The build uses a large sphere for the center and displays an excellent breakdown for the hands. This build also has some great finishing textures that blends the spheres well into a smoother, cohesive shape. The build also isn’t perfectly symmetrical, which is a great way to give the build some life.
The nose is an odd shape but reflects the reference material perfectly. The nose with WorldEdit is actually pretty easy to recreate, as demonstrated by the drawings below:
The nose can be simplified pretty easily. Create an ovoid with //sphere, rotate on the y axis ever so slightly, and then cut away the bottom of the ovoid that intersects with the body to get that Little Caesar’s mascot looking nose (if you know you know…)
The build for Smart Fella is a great example of an organic that can be broken down into simple shapes. Let’s take a look at a breakdown of the build from the front:
The build uses a large sphere for the center and displays an excellent breakdown for the hands. This build also has some great finishing textures that blends the spheres well into a smoother, cohesive shape. The build also isn’t perfectly symmetrical, which is a great way to give the build some life.
The nose is an odd shape but reflects the reference material perfectly. The nose with WorldEdit is actually pretty easy to recreate, as demonstrated by the drawings below:
The nose can be simplified pretty easily. Create an ovoid with //sphere, rotate on the y axis ever so slightly, and then cut away the bottom of the ovoid that intersects with the body to get that Little Caesar’s mascot looking nose (if you know you know…)
The Method Applied to Humanoids on Balance - Hard by kristofk
Being able to build humans is a whole other skill set in its own in regards to organics, but let’s say one wanted to use this method and apply it to building human bodies…where do the simple shapes come in then?
Figure artists will sometimes use two of the simplest “shapes” of all to pose and begin drawing humans: lines and circles. Circles, or in our case, spheres, work well to symbolize joints such as elbows, knees, shoulders, heels of the feet, etc. where lines serve to represent the connections and bones of the figure.
Taking this into Minecraft and looking at the build for Balance, we can identify some of the joints that we would place spheres for on Balance from this angle.
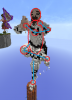
Looking at the lower leg from a better angle, we can see an ovoid in this pose, as well as joints if we want to fill in the rest of the leg by hand. If we take the ovoid route, we can get that nice sharp bend in the leg by cutting the ovoid as depicted by the green line.

Human characters are complex indeed, and we can use the simple shapes method to create a solid base of one…but to truly bring humans to life in Minecraft comes down to how one touches up those shapes and adds in the proper details by hand. Building humanoid organics highlights a weakness in the shapes method because of this, but it is important to point out that this method of building does have limits of what is objectively possible within a skill cap.
Being able to build humans is a whole other skill set in its own in regards to organics, but let’s say one wanted to use this method and apply it to building human bodies…where do the simple shapes come in then?
Figure artists will sometimes use two of the simplest “shapes” of all to pose and begin drawing humans: lines and circles. Circles, or in our case, spheres, work well to symbolize joints such as elbows, knees, shoulders, heels of the feet, etc. where lines serve to represent the connections and bones of the figure.
Taking this into Minecraft and looking at the build for Balance, we can identify some of the joints that we would place spheres for on Balance from this angle.
Looking at the lower leg from a better angle, we can see an ovoid in this pose, as well as joints if we want to fill in the rest of the leg by hand. If we take the ovoid route, we can get that nice sharp bend in the leg by cutting the ovoid as depicted by the green line.
Human characters are complex indeed, and we can use the simple shapes method to create a solid base of one…but to truly bring humans to life in Minecraft comes down to how one touches up those shapes and adds in the proper details by hand. Building humanoid organics highlights a weakness in the shapes method because of this, but it is important to point out that this method of building does have limits of what is objectively possible within a skill cap.
Summary and Final Thoughts
These are some of the strategies I use every single time while building organics. To summarize some takeaway points, here’s what we learned:
1. We can use references to determine what kinds of shapes will be used and needed to create a base.
2. We can cut away pieces of shapes we generate with WorldEdit to suit our needs for an organic.
3. We can look at most builds and better understand how they were created and how they are shaped, and use shapes to create more dynamic poses.
Ultimately, there are a million ways to build, and this is one of them that works really well with small to medium size organics, but can be applied to larger and more complex organics, such as humanoids. At the end of the day, do what works best for you as a builder!
Thank you once again to Pink for the opportunity to share some knowledge for the series, and tune in next week for an article about Architecture!


