Contents
• The value of limited variation
• Purpose of blocks
• Mapper case study
Introduction:

Welcome to week two of Basics! I’m happy you stopped by for a quick lesson on what I consider to be the most vital part of a good map. Parkour Variance!
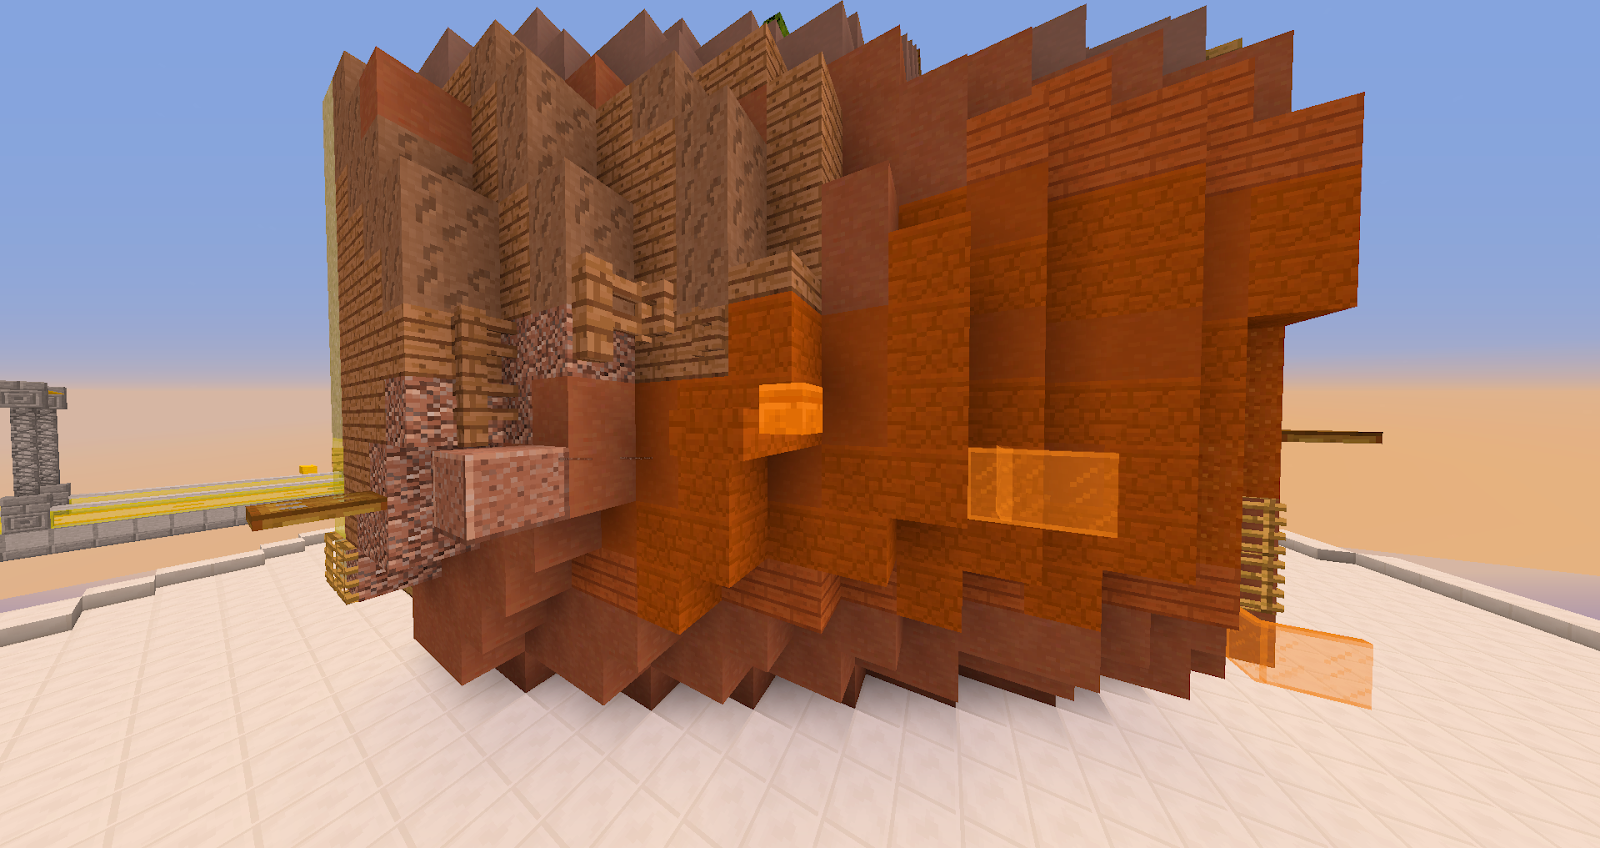
Jump variation is described as the aspect of parkour design attributing to flow, replayability, and most importantly fun. It’s built on the idea of fully utilizing unique hitboxes and block heights to create a more elevated experience. Like Pink said in Week 1, parkour is mostly an upwards climbing motion so having those lower tiered blocks, like a slab for instance, can drastically change how your parkour feels.

[Demonstration of jump variation from SwissRoll]
 1. Limited Variation
From what I understand, variation can be a scary thing for veteran and aspiring mappers alike, but it doesn’t have to be. When building parkour, I like to utilize a concept that I call limited variation.
As the name implies, limited variation is when you only allow yourself to use a specific set of blocks. This concept not only eliminates the fear of over-variation, but fosters the idea of having to be more creative as a result of the constraints you set on yourself.
Let’s take a look at a case study I created for week two of Basics.
1a. Limited Variation (Slime)
Here are the steps!
1 - Make a barebones set of blocks similar to this

[Note that the color / aesthetic is not important]
2 - Build parkour while only using these block types
Let’s study this gif for a moment. Follow this chain.
Carpet ➜ Pane ➜ Head ➜ Ladder ➜ Slime ➜ Slab
In this example, you can see limited variation was followed as the blocks listed above were part of our block selection. As I described earlier, you can also see the parkour climbing in height as jumps go on, which allows us to create a more varied environment. Without the height gained from the ladder, the slime to the slab is impossible.
3 - Try it for yourself with some pre-made color parkour palettes!
* courtesy of Inktest
View attachment 56865
2. Purpose of Blocks
Let’s take a look at two blocks that can help spice up your parkour!

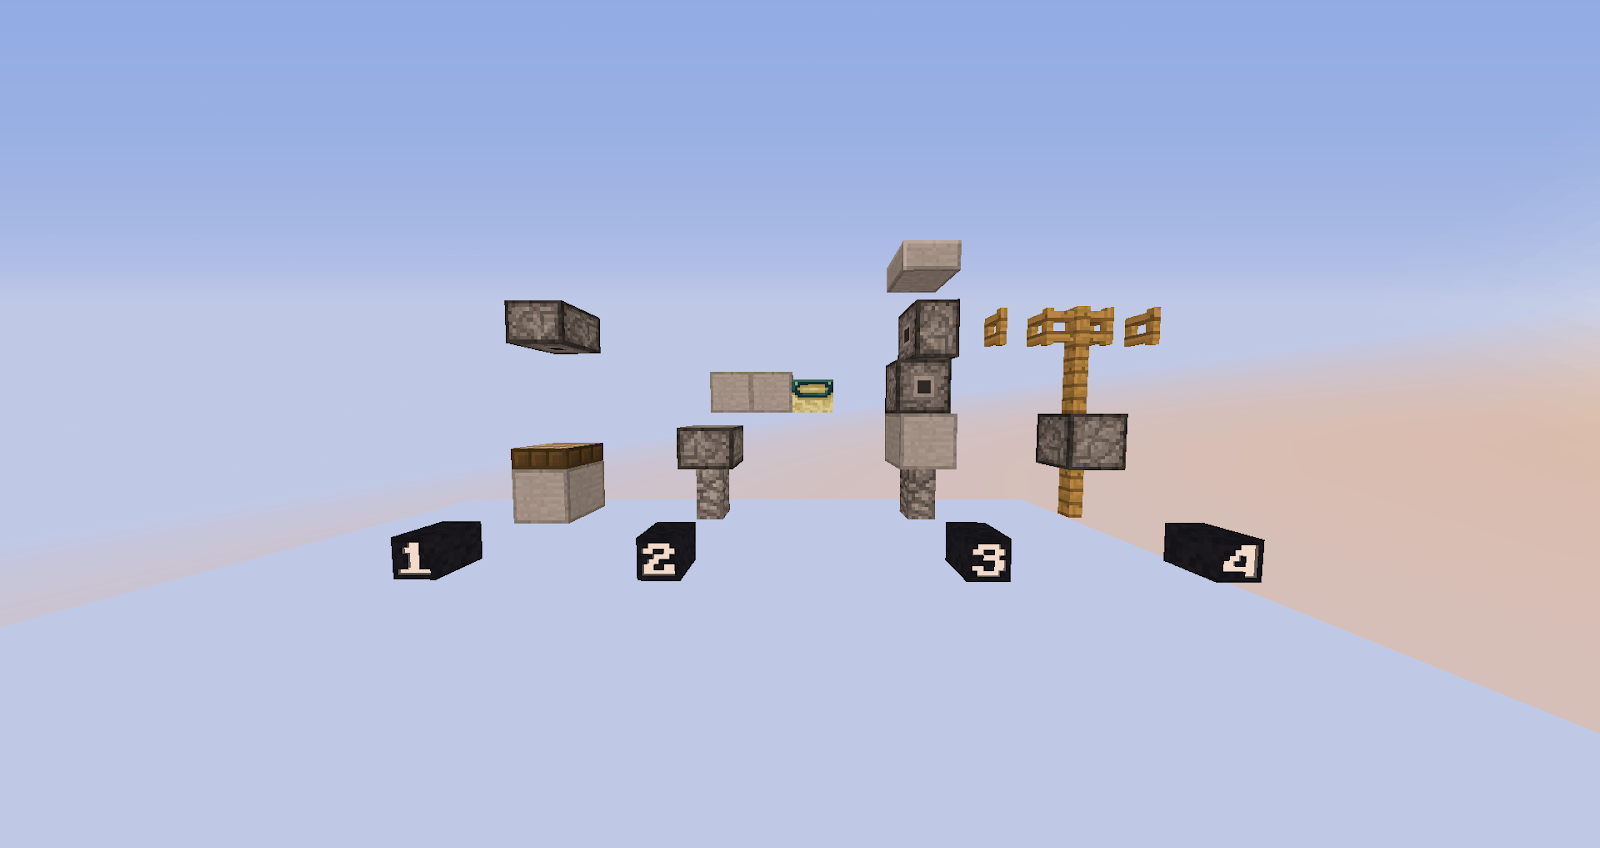
Let’s examine this image detailing piston base uses. Note the enchanting table is the same height as the piston base. You should use the piston base over the enchanting table in most cases.
From left to right, let’s start with example 1.
Example 1 is a demonstration of its place in a vertical squeeze. Simple enough, you can squeeze into that gap.
Example 2 is a demonstration showing its height advantages. From the piston base, you can jump to the end portal frame, but not to the block.
Example 3 is a demonstration of its ability to “thin” a block. With the two piston bases in place, the player is only able to stand on the left corner of the smooth stone block below.
Example 4 is a small neo which can be found on the map Mushroom Kingdom. It’s another good example of restricting where a player can stand on a block.

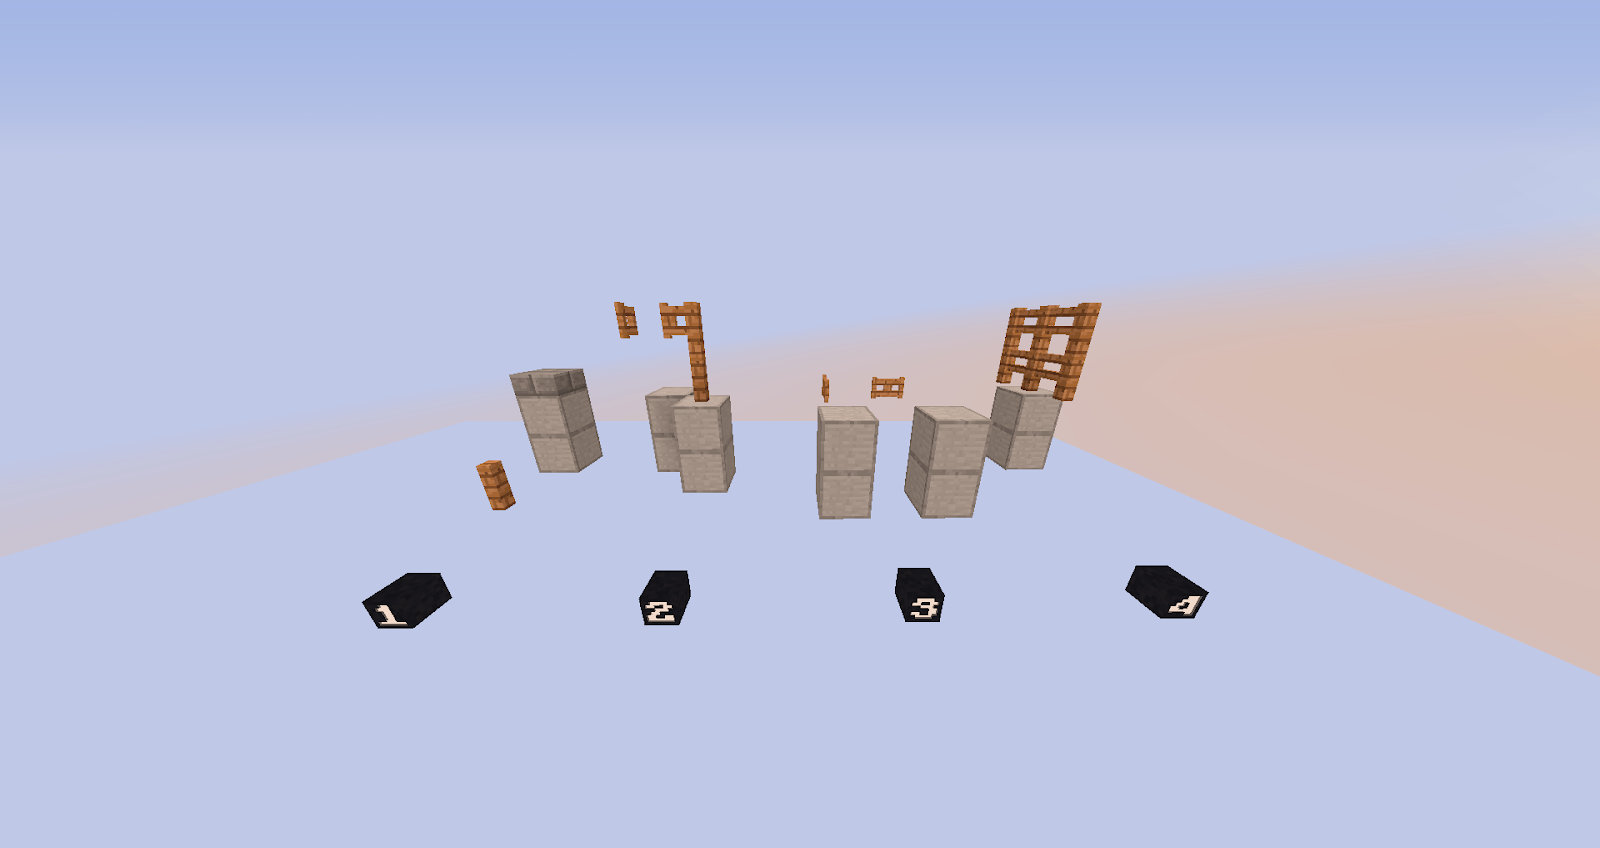
Let’s examine this image detailing various uses of fences.
From left to right, let’s start with example 1.
Example 1 is a simple demonstration showing a fence is taller than a normal block, allowing the player to reach the slab.
Example 2 is a demonstration of fences and fence gates used in blockage. When combined, they have a slightly wider hitbox than a normal block.
Example 3 is a demonstration of how fence gates can be used to make a jump require more momentum. From the left smooth stone block, you can head hitter from the front and make it. However, on the right smooth stone block, if you are to head hitter from the front you will not make it.
Example 4 is a demonstration on how a fence can be used to restrict parts of a block a player can stand on. By effectively dividing the middle, the player can only stand on the left or right edge of the block.
3. Field Report
Let’s take a look at some great examples of variation in the field of accepted maps.
Case 01 - Idaten (Shinxray)
Pane ➜ Head ➜ Fence ➜ Ladder ➜ Pane ➜ Block
Utilizes the concept of parkour rising as your course continues. Good variation using limited blocks
Case 02 - Bled (trashthetic)
Trapdoor ➜ Head ➜ Ladder ➜ Block ➜ Head ➜ Vine ➜ Block ➜ Slab ➜ Ladder
As with the previous examples, parkour is well varied, jumps follow the idea of limited variation, and the parkour continues to build in elevation.
Summary + Final Thoughts
And that’s all there is to it!
Here's a summary for TL;DR

• The value of limited variation
• Purpose of blocks
• Mapper case study
Introduction:
Welcome to week two of Basics! I’m happy you stopped by for a quick lesson on what I consider to be the most vital part of a good map. Parkour Variance!
Jump variation is described as the aspect of parkour design attributing to flow, replayability, and most importantly fun. It’s built on the idea of fully utilizing unique hitboxes and block heights to create a more elevated experience. Like Pink said in Week 1, parkour is mostly an upwards climbing motion so having those lower tiered blocks, like a slab for instance, can drastically change how your parkour feels.
[Demonstration of jump variation from SwissRoll]

From what I understand, variation can be a scary thing for veteran and aspiring mappers alike, but it doesn’t have to be. When building parkour, I like to utilize a concept that I call limited variation.
As the name implies, limited variation is when you only allow yourself to use a specific set of blocks. This concept not only eliminates the fear of over-variation, but fosters the idea of having to be more creative as a result of the constraints you set on yourself.
Let’s take a look at a case study I created for week two of Basics.
1a. Limited Variation (Slime)
Here are the steps!
1 - Make a barebones set of blocks similar to this
[Note that the color / aesthetic is not important]
2 - Build parkour while only using these block types
Let’s study this gif for a moment. Follow this chain.
Carpet ➜ Pane ➜ Head ➜ Ladder ➜ Slime ➜ Slab
In this example, you can see limited variation was followed as the blocks listed above were part of our block selection. As I described earlier, you can also see the parkour climbing in height as jumps go on, which allows us to create a more varied environment. Without the height gained from the ladder, the slime to the slab is impossible.
3 - Try it for yourself with some pre-made color parkour palettes!
* courtesy of Inktest
View attachment 56865
2. Purpose of Blocks
Let’s take a look at two blocks that can help spice up your parkour!
- Piston Base
Let’s examine this image detailing piston base uses. Note the enchanting table is the same height as the piston base. You should use the piston base over the enchanting table in most cases.
From left to right, let’s start with example 1.
Example 1 is a demonstration of its place in a vertical squeeze. Simple enough, you can squeeze into that gap.
Example 2 is a demonstration showing its height advantages. From the piston base, you can jump to the end portal frame, but not to the block.
Example 3 is a demonstration of its ability to “thin” a block. With the two piston bases in place, the player is only able to stand on the left corner of the smooth stone block below.
Example 4 is a small neo which can be found on the map Mushroom Kingdom. It’s another good example of restricting where a player can stand on a block.
- Fences + Fence gates
Let’s examine this image detailing various uses of fences.
From left to right, let’s start with example 1.
Example 1 is a simple demonstration showing a fence is taller than a normal block, allowing the player to reach the slab.
Example 2 is a demonstration of fences and fence gates used in blockage. When combined, they have a slightly wider hitbox than a normal block.
Example 3 is a demonstration of how fence gates can be used to make a jump require more momentum. From the left smooth stone block, you can head hitter from the front and make it. However, on the right smooth stone block, if you are to head hitter from the front you will not make it.
Example 4 is a demonstration on how a fence can be used to restrict parts of a block a player can stand on. By effectively dividing the middle, the player can only stand on the left or right edge of the block.
3. Field Report
Let’s take a look at some great examples of variation in the field of accepted maps.
Case 01 - Idaten (Shinxray)
Pane ➜ Head ➜ Fence ➜ Ladder ➜ Pane ➜ Block
Utilizes the concept of parkour rising as your course continues. Good variation using limited blocks
Case 02 - Bled (trashthetic)
Trapdoor ➜ Head ➜ Ladder ➜ Block ➜ Head ➜ Vine ➜ Block ➜ Slab ➜ Ladder
As with the previous examples, parkour is well varied, jumps follow the idea of limited variation, and the parkour continues to build in elevation.
Summary + Final Thoughts
And that’s all there is to it!
Here's a summary for TL;DR
Last edited: